English
 Español
 Русский
 لالعربية

Ribbon Mixer Maintenance: Complete Preventive Care Guide for 2026
release time:
2026-06-24
Complete guide to ribbon mixer maintenance covering preventive maintenance, troubleshooting, cleaning procedures, and expert repair advice for industrial professionals.
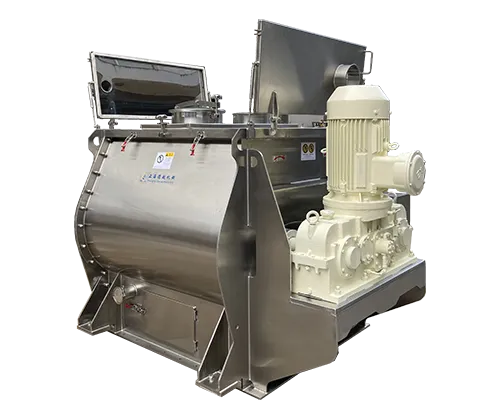
Ribbon Mixer Maintenance: Complete Preventive Care Guide for 2026
A ribbon mixer is one of the most versatile mixing machines across pharmaceutical, food, chemical, and building materials industries. Yet even the highest-quality ribbon blender will suffer premature failure if proper ribbon mixer maintenance is neglected. Downtime costs businesses thousands of dollars per hour, and unexpected breakdowns can compromise product quality, safety compliance, and delivery schedules.
This guide covers everything you need to know about ribbon mixer preventive maintenance, from daily inspection routines to seasonal overhaul procedures. Whether you are an operations manager or a maintenance technician, this article provides actionable steps backed by industry best practices.
What Is a Ribbon Mixer?
A ribbon blender, commonly called a ribbon mixer, is a horizontal cylindrical vessel equipped with a double-layer ribbon agitator. The inner ribbon pushes material toward the vessel ends while the outer ribbon pushes material back toward the center, creating a continuous convective mixing pattern. This design enables rapid, uniform blending of dry powders, granules, and viscous pastes.
Ribbon mixers handle diverse materials including flour, cement, fertilizer, spices, pharmaceutical intermediates, and plastic resins. Their relatively simple mechanical design — consisting of a tank, agitator shaft, bearings, seals, and a drive unit — makes them straightforward to maintain. However, that simplicity often leads operators to underestimate the importance of systematic maintenance.
Why Preventive Maintenance Matters
Preventive maintenance involves regular inspections, adjustments, and part replacements before equipment failures occur. For ribbon mixers, a structured ribbon mixer preventive maintenance program delivers measurable benefits:
Reduced unplanned downtime: Scheduled maintenance requires only a few hours of planned stoppage, while an emergency breakdown can halt production for days.
Extended equipment lifespan: Mixers receiving consistent preventive maintenance routinely operate 15 to 20 years, compared to 5 to 8 years for units relying solely on reactive repairs.
Consistent product quality: Worn seals, misaligned paddles, or degraded bearings introduce contamination risks and blend inconsistencies that can trigger costly product recalls.
Lower total cost of ownership: Preventive maintenance reduces total maintenance costs by approximately 25 to 30 percent compared to a reactive-only approach.
Regulatory compliance: Food, pharmaceutical, and chemical manufacturers must demonstrate documented maintenance records during FDA, USDA, and GMP audits.
Daily Inspection Routine
Every shift should begin with a 10 to 15 minute visual and operational inspection of the ribbon mixer.
Pre-Startup Checks
Visual inspection of the mixing chamber: Look for signs of wear, corrosion, or material buildup on the ribbon agitator and tank interior. Ensure all access doors and inspection ports are securely closed.
Drive unit examination: Inspect the motor, gearbox, and coupling for unusual noise, vibration, or oil leaks. Verify belt tension if belt-driven.
Seal inspection: Check the shaft seal area for leakage. Even minor seepage indicates replacement may be imminent.
Bearing housing check: Feel bearing housings for excessive heat. Normal operating temperature should stay below 70°C (158°F).
Operational Monitoring
During the first five minutes of operation, listen for abnormal sounds indicating loose components or misalignment. Monitor motor amperage — a sudden increase suggests overloading or mechanical binding, while a decrease may signal slippage or a broken component.
Weekly and Monthly Tasks
Weekly Tasks
Fastener torque verification: Check all accessible bolts including drive motor mounts, gearbox mounting, and discharge valve. Vibration from continuous operation loosens fasteners over time.
Discharge valve inspection: Operate the discharge valve through several open-close cycles. Look for material accumulation around the valve seat.
Exterior cleaning: Remove dust and residue from the mixer exterior, especially around electrical panels and ventilation openings.
Monthly Tasks
Belt and chain inspection: Measure tension and wear on belt or chain drives. Replace belts showing cracks, fraying, or glazing.
Lubrication top-up: Check gearbox oil levels and add lubricant as needed. For grease-lubricated bearings, inject the recommended amount through zerk fittings.
Electrical connections: Tighten terminal connections on the motor and control panel to prevent overheating from loose contacts.
Quarterly and Annual Overhaul
Quarterly Maintenance
Gearbox oil change: Drain and replace gearbox oil every three to six months depending on operating intensity. Use only the manufacturer-recommended oil grade.
Ribbon agitator measurement: Measure the clearance between ribbon paddles and the tank wall. The typical gap should be between 3 mm and 5 mm.
Shaft alignment check: Verify the agitator shaft remains properly aligned with the drive unit. Misalignment causes uneven bearing loads and accelerates seal wear.
Annual Maintenance
Complete bearing replacement: Replace bearings annually for mixers operating more than 16 hours per day. Lighter-duty applications may extend this to two years.
Tank interior inspection: Inspect the entire interior surface for thinning, pitting, or weld defects. Stainless steel tanks should be passivated annually.
Motor insulation test: Perform a megger test on motor windings to detect insulation degradation before it leads to winding failure.
Structural frame inspection: Check the mixer support frame and foundation bolts for cracks or loosening, especially on portable or skid-mounted units.
Ribbon Mixer Cleaning Procedures
Ribbon mixer cleaning directly impacts product quality, cross-contamination prevention, and regulatory compliance. The procedure varies depending on whether the mixer handles food-grade materials, pharmaceutical ingredients, or industrial chemicals.
Dry Cleaning (Inter-Batch)
Run the mixer empty for 3 to 5 minutes to dislodge loose material.
Use compressed air or a vacuum system rated for the material classification to remove residual powder.
Inspect visually and with a white cloth wipe-down to confirm absence of cross-contamination.
Wet Cleaning (CIP Systems)
Flush the tank with warm water for 5 minutes to remove bulk residues.
Circulate a validated cleaning solution (typically caustic soda at 1 to 2 percent) for 20 to 30 minutes at 60 to 70°C.
Rinse with potable water until effluent pH matches incoming water pH.
Perform a final rinse with purified water if process specifications require it.
Manual Deep Cleaning
Lock out and tag out the drive unit before entering the mixing chamber.
Remove the discharge valve and any removable internal components.
Scrub all interior surfaces with approved detergent and soft-bristle brush. Avoid abrasive pads on stainless steel.
Rinse completely and allow to air-dry before reassembly.
Common Faults and Mixer Troubleshooting
Effective mixer troubleshooting begins with understanding common failure modes and their root causes.
| Fault Symptom | Possible Cause | Corrective Action |
|---|---|---|
| Excessive vibration | Unbalanced agitator, loose bolts, worn bearings | Check balance, tighten fasteners, replace bearings |
| Motor overheating | Overloaded feed, degraded oil, faulty voltage | Reduce feed rate, change oil, verify voltage |
| Leakage at shaft seal | Worn seal, improper installation, shaft wear | Replace seal kit, inspect shaft sleeve, verify torque |
| Inadequate mixing | Wrong fill level, damaged ribbon, reversed rotation | Operate within 30–80% fill, inspect ribbon, verify direction |
| Noisy gearbox | Low oil, contaminated oil, gear wear | Change oil, flush if needed, schedule rebuild |
| Discharge valve sticks | Material compaction, worn gasket, actuator fault | Clean seat, replace gasket, inspect actuator |
Advanced Troubleshooting Techniques
For persistent faults, consider these advanced diagnostic methods:
Vibration analysis: Install a portable vibration analyzer on bearing housings. Rising amplitude at specific frequencies pinpoints the fault source.
Thermal imaging: Scan motor, gearbox, and bearings with an infrared camera. Hot spots exceeding 10°C above normal indicate friction or lubrication deficiency.
Current signature analysis: Monitor motor current waveforms for harmonic distortions indicating mechanical faults before visible symptoms appear.
Seal and Bearing Care
The shaft seal and bearings account for approximately 60 percent of all unplanned downtime in ribbon mixer operations.
Mechanical Seal Management
Inspect seals every three months for weeping, carbon ring cracking, or spring fatigue.
Maintain the seal flush plan per manufacturer specification — some seals require pressurized barrier fluid.
Never operate the mixer without fluid in the seal chamber. Dry running destroys seal faces within minutes.
Always replace the entire seal kit including O-rings, gaskets, and carbon rings when servicing.
Bearing Lubrication Best Practices
Use only the grease grade specified by the mixer manufacturer, typically NLGI Grade 2 lithium complex.
Inject 1 to 2 grams per zerk fitting per cycle. Over-greasing forces old grease out and damages seals.
Maintain a lubrication log recording date, grease type, quantity, and bearing temperature for trend analysis.
Safety Protocols During Maintenance
Lockout/Tagout (LOTO): Isolate electrical supply and apply lockout devices before any internal work. Verify zero energy state with a calibrated tester.
Confined space entry: If the tank diameter exceeds 60 cm, follow confined space entry permit procedures including atmospheric testing.
PPE: Wear safety glasses, gloves, and steel-toed boots minimum. Additional PPE may be required for food or chemical applications.
Hot work permits: Welding or grinding near the mixer requires a hot work permit and fire watch, especially in combustible dust environments.
Frequently Asked Questions
How often should a ribbon mixer be serviced?
Basic inspections should occur daily, with weekly and monthly tasks on a rotating schedule. Gearbox oil should be changed every three to six months, bearings replaced annually for heavy-duty use, and a complete overhaul conducted every two to three years depending on operating hours and material abrasiveness.
What is the most common cause of ribbon mixer failure?
Shaft seal failure accounts for the largest percentage of downtime. Proper seal selection, correct installation, and adherence to a lubrication schedule can extend seal life from six months to over two years in most applications.
Can I clean a ribbon mixer without taking it apart?
For routine inter-batch cleaning, you can run the mixer empty with compressed air or a CIP system. However, for deep cleaning or allergenic material handling, partial or complete disassembly is recommended to access the ribbon paddles and tank corners.
What type of lubricant should I use for a food-grade ribbon mixer?
Use NSF H1-registered lubricants for any point where incidental food contact is possible. Common H1 products include Kluber Isoflex NBU 15, Mobil SHC 007, and SKF LGMT 2. Always verify compatibility with your specific mixer model and operating temperature.
How much does preventive maintenance cost versus reactive repairs?
A preventive maintenance program typically costs 15 to 25 percent of the mixer's purchase price annually. Reactive repairs including emergency labor and expedited shipping can cost 3 to 5 times more per incident, making preventive programs financially advantageous within the first year.
Conclusion
Effective ribbon mixer maintenance is a strategic investment that protects production continuity, product quality, and operator safety. By implementing a structured ribbon mixer preventive maintenance program that includes daily inspections, scheduled lubrication, systematic ribbon mixer cleaning, and disciplined mixer troubleshooting, facilities can achieve equipment reliability rates exceeding 95 percent and extend mixer service life well beyond the industry average.
Start by auditing your current maintenance practices against the checklists in this guide. Identify gaps, prioritize the highest-impact improvements, and build a maintenance culture where every team member contributes to keeping mixing equipment running at peak performance. The investment in preventive care today pays dividends in avoided downtime, lower repair costs, and consistent product quality for years to come.
Ready to optimize your mixing operations? Review your current maintenance schedule, document baseline equipment conditions, and establish a quarterly review cadence to continuously improve your ribbon mixer reliability program.
label:
related news